🛠️ DragDrop: Sortable drop preview

Hey ,

I'm thrilled to help you learn JavaScript. Unfortunately, you've landed on a page where you cannot access with your current purchase.

Please upgrade (use this link) access this content.

I'm super eager to help you learn more!

🛠️ DragDrop: Sortable drop preview

We want to allow users to drop an element anywhere inside the dropzone.

The key is to figure out how to position the preview element when the user drags the original element.

Preparations

We’ll shift some boxes into the dropzone for this lesson.

<h2>Drop Zone</h2>
<div data-dropzone>
  <div class="box" data-color="red" data-draggable></div>
  <div class="box" data-color="orange" data-draggable></div>
  <div class="box" data-color="yellow" data-draggable></div>
  <div class="box" data-color="green" data-draggable></div>
</div>

Figuring out the positions

We can use two methods to determine where to place the preview.

  1. Using the gaps between elements
  2. Using the elements

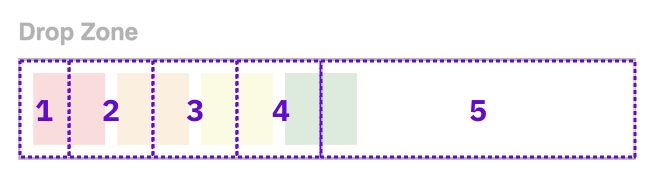
Determine preview position with the gaps

We can position the preview according to the gaps between elements.

Here’s a picture of what this means.

Potential positions of the preview element.
  • If the user drags the original element between the left of the dropzone and the middle of the first element, we put them in position 1.
  • If the user drags the original element between the middle of first element and the middle of second element, we put them in position 2.
  • And so on…

Unfortunately, the gap method isn’t suitable for responsive design. You need to create two extra positions (the leftmost one and the rightmost one) per now.

Potential positions of the preview element when there are two rows of elements.

We need to use another method that makes sense.

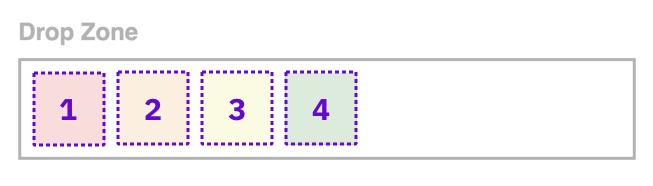
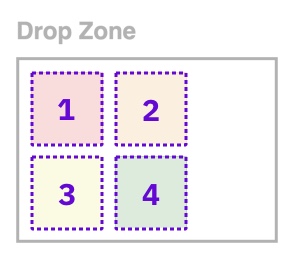
Determine preview position with the elements

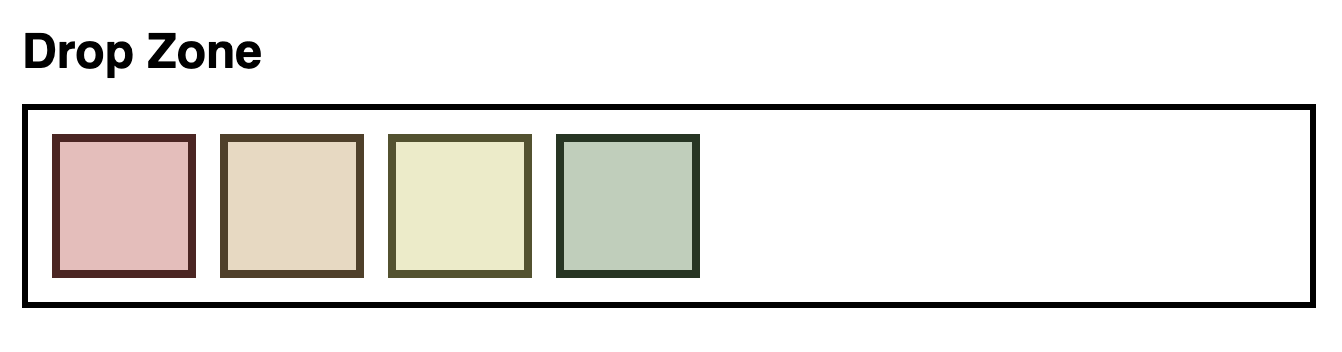
We can position the preview when the dragged element lands on another element. Here’s a picture of what this means:

This method works with responsive design because we don’t have to worry about the number of rows we have.

Getting preview positions

Let’s start by creating a function called getPreviewPositions. This function returns an array of possible positions.

const getPreviewPositions = _ => {
  // Return possible positions
}

To get the preview positions, we need to know the number of elements inside the dropzone.

const getPreviewPositions = dropzone => {
  const elements = [...dropzone.children]
}

Each preview position is marked by the element’s bounding box. We return this bounding box to get a list of positions.

const getPreviewPositions = dropzone => {
  const elements = [...dropzone.children]
  return elements.map(element => {
    return element.getBoundingClientRect()
  })
}

If you log the preview positions, you should see an array with several DOMRects

const dropzone = document.querySelector('[data-dropzone]')
console.log(getPreviewPositions(dropzone))
Array of positions.

Drawing the positions

It helps to draw the positions on screen so we can see we’re using the correct positions. To do this, we can create an extra <div> for each position.

const dropzone = document.querySelector('[data-dropzone]')
const positions = getPreviewPositions(dropzone)

positions.forEach(pos => {
  const div = document.createElement('div')
  div.style.position = 'absolute'
  div.style.top = pos.top + 'px'
  div.style.left = pos.left + 'px'
  div.style.width = pos.width + 'px'
  div.style.height = pos.height + 'px'
  div.style.backgroundColor = '#eee'
  div.style.border = '3px solid #222'
  div.style.opacity = 0.75

  document.body.append(div)
})
Drew the preview postiions onto the screen.

We’ve now confirmed that preview positions are in the correct place. Feel free to delete the code we wrote for drawing these preview boxes.

Determining the preview element’s position

First, we get a list of possible positions with getPreviewPositions.

function move (event) {
  // ...
  const positions = getPreviewPositions(dropzone)
}

Next, we need to know if the user dragged the original element over a preview position.

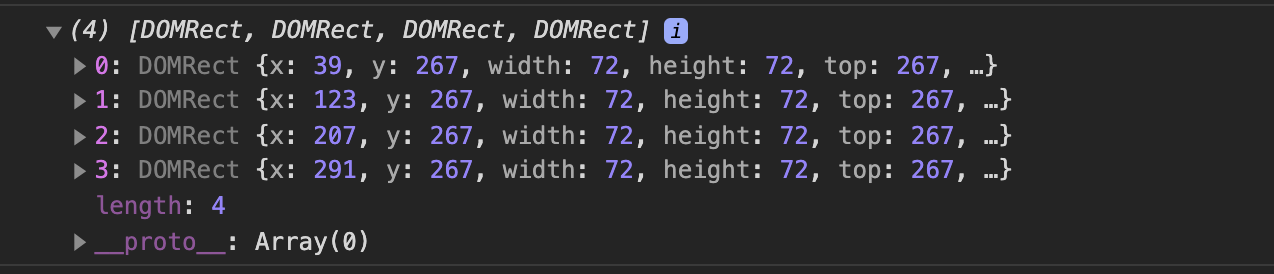
If the top-left corner of the dragged element falls inside the top, right, bottom, and left boundaries of a preview position, we know the user dragged the original element into a preview position. We want to get the index of this preview position.

function move (event) {
  // ...
  const position = positions.findIndex(pos => {
    return (pos.left < left && left < pos.right) &&
    (pos.top < top && top < pos.bottom)
  })

  console.log(position)
}

Here are the position values:

  • -1 when the dragged element is not in any box
  • 0 when user drags element onto first box
  • 1 when user drags element onto second box
  • 2 when user drags element onto third box
  • And so on…

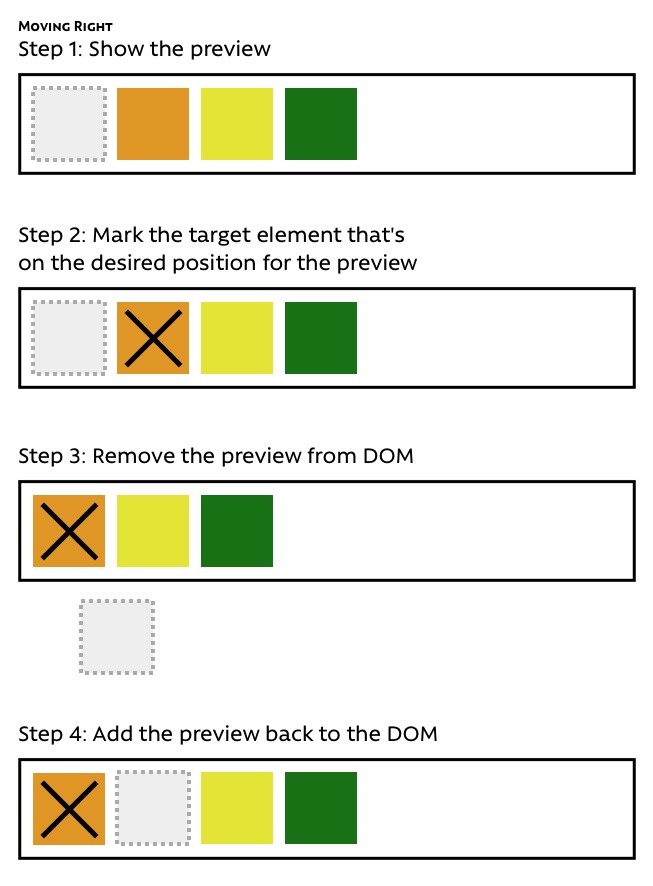
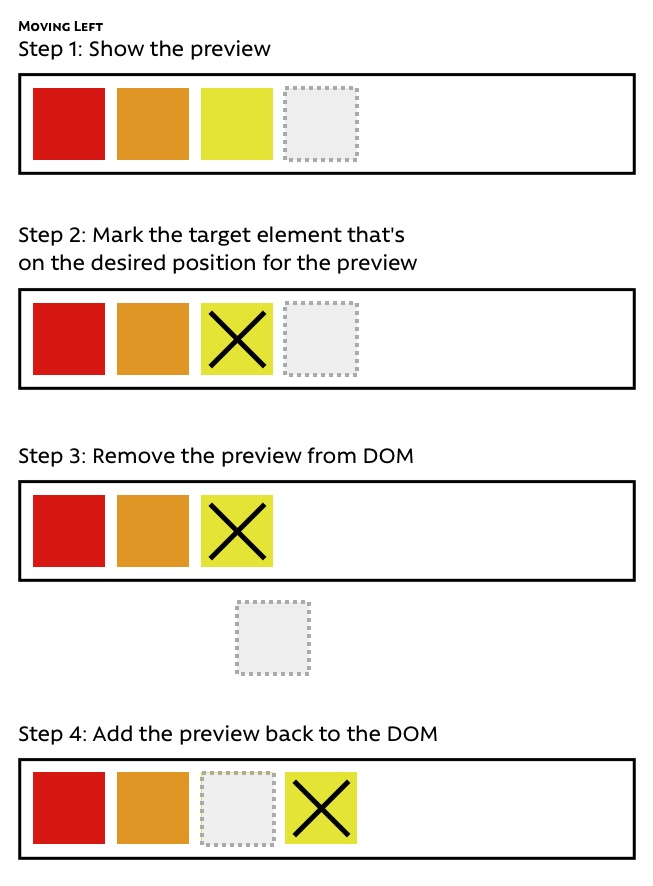
Moving the preview element

We don’t need to do anything if position is -1. Here, we end the function with an early return.

function move (event) {
  // ...
  if (position === -1) return
}

But we need to move the preview element in other cases.

First, we need to mark the element that’s in the current target position.

function move (event) {
  // ...
  const elem = dropzone.children[position]
}

Next, we position the preview element after this marked element.

function move (event) {
  // ...
  const elem = dropzone.children[position]
  elem.after(preview)
}

This method works if we drag the original element from left to right. But it doesn’t work if we drag the original element from right to left.

Alternatively, we can position the preview element before the marked element.

function move (event) {
  // ...
  const elem = dropzone.children[position]
  elem.before(preview)
}

This doesn’t work if we drag the original element from left to right, but it works if we drag the original element from right to left.

Understanding why before and after work differently

Four things happen when we shift the preview element’s position:

  1. We show the preview in the DOM
  2. We mark the target element that’s on the desired position
  3. We remove the preview from the DOM
  4. We add the preview back in

after works when moving the preview element from left to right because it uses the following steps:

before works when moving the preview element from right to left because it uses the following steps:

Positioning the preview element correctly

If we want to position the preview element correctly in both directions, we need to know the current position of the preview element.

function move (event) {
  // ...
  const previewPos = [...dropzone.children].findIndex(element => {
    return element === preview
  })
}

We’ll then use before or after depending on where the preview was previously at.

function move (event) {
  // ...
  if (position > previewPos) {
    elem.after(preview)
  } else {
    elem.before(preview)
  }
}

Multiple dropzones

FYI: The code we have works with multiple drop zones.

Can you figure out why? :)

after Polyfill

Make sure you add the after polyfill since Safari needs it to work.

/**
 * Element.after polyfill
 * @see https://developer.mozilla.org/en-US/docs/Web/API/ChildNode/after
 */
;(function (arr) {
  arr.forEach(function (item) {
    /* eslint-disable */
    if (item.hasOwnProperty('after')) return
    /* eslint-enable */

    Object.defineProperty(item, 'after', {
      configurable: true,
      enumerable: true,
      writable: true,
      value: function after () {
        var argArr = Array.prototype.slice.call(arguments)
        var docFrag = document.createDocumentFragment()

        argArr.forEach(function (argItem) {
          var isNode = argItem instanceof Node
          docFrag.appendChild(isNode ? argItem : document.createTextNode(String(argItem)))
        })

        this.parentNode.insertBefore(docFrag, this.nextSibling)
      }
    })
  })
})([Element.prototype, CharacterData.prototype, DocumentType.prototype])