🛠️ Tiny: Changing Parent State

Hey ,

I'm thrilled to help you learn JavaScript. Unfortunately, you've landed on a page where you cannot access with your current purchase.

Please upgrade (use this link) access this content.

I'm super eager to help you learn more!

🛠️ Tiny: Changing Parent State

Children components sometimes need to change values inside a parent component’s state. This is why we have an “Increase parent count” button in the child component.

What we can do is emit a custom event from the child component to the parent component. The parent then listens to this event and responds accordingly.

Creating a custom event

We can create a custom event with new CustomEvent. It has the following syntax:

const event = new CustomEvent(eventName, eventOptions)
  • eventName is the name of the event we want to create.
  • eventOptions is the options we’re passing into the event.

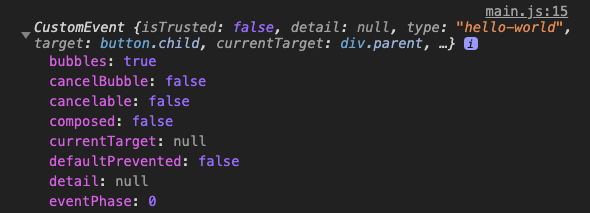
Let’s create a custom event called hello-world for example. Here’s how it will look like:

const event = new CustomEvent('hello-world')
console.log(event)

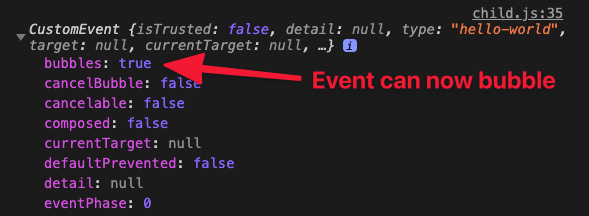
Custom events do not bubble by default. We can allow bubbling by passing bubbles: true to the event options.

const event = new CustomEvent('hello-world', {
  bubbles: true
})
console.log(event)

Emitting an event

Any DOM element can emit an event. To emit the event, we call the dispatchEvent method.

element.dispatchEvent(event)

Here’s an example. Say we have the following HTML. When we click on the button, we want to emit a hello-world event.

<div class="parent">
  <button class="child"></button>
</div>
const button = document.querySelector('button')
button.addEventListener('click', event => {
  const helloWorldEvent = new CustomEvent('hello-world', {
    bubbles: true
  })
  button.dispatchEvent(helloWorldEvent)
})

We can listen to this hello-world event from the parent since the event bubbles.

const parentElement = document.querySelector('.parent')
parentElement.addEventListener('hello-world', event => {
  console.log(event)
})

Passing information to the custom event

We can send information to a custom event by adding a detail property when creating the event.

const button = document.querySelector('button')
button.addEventListener('click', event => {
  const helloWorldEvent = new CustomEvent('hello-world', {
    bubbles: true,
    detail: { message: 'Hello!' }
  })
  button.dispatchEvent(helloWorldEvent)
})

The listening element can then receive this information from the same detail property.

const parentElement = document.querySelector('.parent')
parentElement.addEventListener('hello-world', event => {
  console.log(event.detail)
})

Emitting a custom event in Tiny

When someone clicks on the “increase parent count” button, we want to dispatch an event from the child component to the parent component. Dispatching an event is also called emitting an event.

To emit this event, we’ll create a method called emit. We’ll add this method to options so users can use it.

export default function Tiny (options) {
  // ...
  options.emit = function () {
    // ...
  }
  // ...
}

In emit, we need to create and dispatch a custom event. To create the event, we need the event name and options. For options, the only thing we’re interested in is the detail property, so we’ll ask users to pass in detail instead.

export default function Tiny (options) {
  // ...
  options.emit = function (eventName, detail) {
    // ...
  }
  // ...
}

We’ll then create and dispatch the event from the child component.

export default function Tiny (options) {
  // ...
  options.emit = function (eventName, detail) {
    const event = new CustomEvent(eventName, {
      bubbles: true,
      detail
    })
    options.element.dispatchEvent(event)
  }
  // ...
}

To make the code slightly more robust, we may want to include a third (but optional) eventOpts argument. This lets users customize the event they want to emit.

export default function Tiny (options) {
  // ...
  options.emit = function (eventName, detail, eventOpts = {}) {
    const event = new CustomEvent(eventName, {
      bubbles: true,
      detail,
      ...eventOpts
    })
    options.element.dispatchEvent(event)
  }
  // ...
}

Users can emit an event to increase parent count like this:

// child.js
export default Tiny({
  // ...
  increaseParentCount (event) {
    this.emit('increase-parent-count', {
      amount: 1
    })
  },
  // ...
})

We can now listen to this event on the parent component. This event listener must live on an ancestor element to the child component.

This means we can place the event listeners in two places:

  • The <div> that wraps the entire component
  • The <div> with the .half class.

Either is fine. I went with the first one.

Tiny({
  // ...
  increaseSelfCount (event) {
    // ...
  },

  template () {
    return `
      <div
        class="component parent-component flow"
        tiny-listener="[increase-parent-count, increaseSelfCount]"
      >
        <!-- ... -->
      </div>
    `
  }
})

In increaseSelfCount, we can get amount (which was passed from the child component into the event) via the detail property. Once we have this, we can call setState to update the state and the UI.

Tiny({
  // ...
  increaseSelfCount (event) {
    const amount = event.detail.amount
    this.setState({
      count: this.state.count + amount
    })
  },
  // ...
})

Note: You can remove increaseChildCount since we’re not using that method anymore. You can also remove the childCount property from state.